Easy
15 min
30 min
45 min
5 jars
Table of Contents
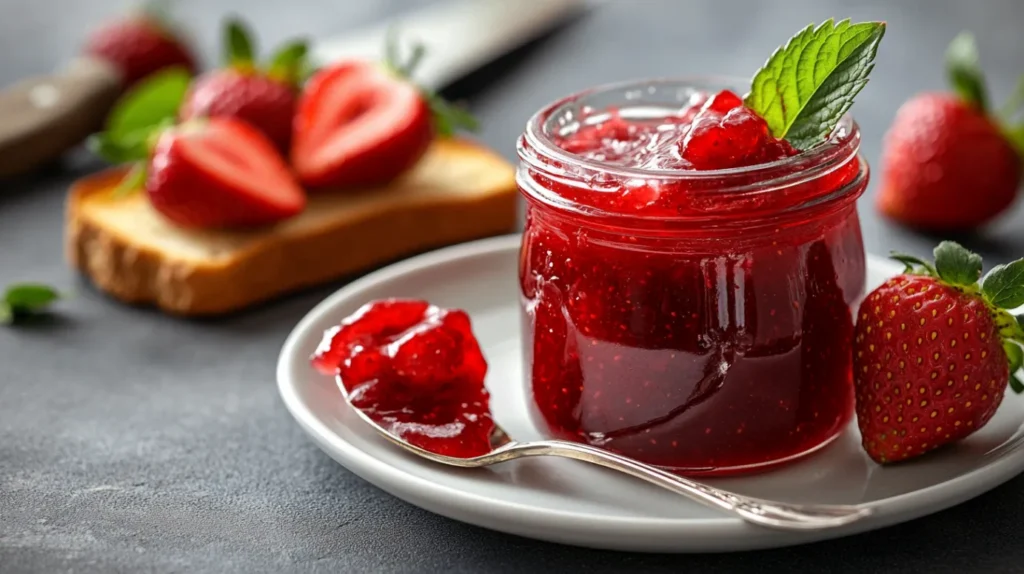
There’s nothing quite like homemade strawberry jam! 🍓 Bursting with fresh, sweet, and slightly tangy flavors, this classic jam is the perfect way to preserve the taste of ripe strawberries all year round. Whether you’re spreading it on toast, spooning it over pancakes, or using it as a dessert filling, this traditional strawberry jam recipe is easy to make and incredibly rewarding. No artificial preservatives, just real, wholesome ingredients!
Key Benefits of Homemade Strawberry Jam
- Pure, Fresh Ingredients
Unlike store-bought jams, which often contain high-fructose corn syrup, artificial flavors, and preservatives, this recipe uses only fresh strawberries, sugar, and lemon juice. You know exactly what’s going into your jam, making it a healthier, more natural option. - No Need for Pectin
This recipe relies on the natural pectin found in strawberries and lemon juice, eliminating the need for added commercial pectin. This results in a more natural texture and allows you to control the sweetness without worrying about the jam becoming too thick or too runny. - Customizable Sweetness
You can adjust the sugar level to suit your taste. Whether you prefer a classic sweet jam, a low-sugar version, or a honey-sweetened alternative, you have complete control over the final flavor. You can even experiment with sugar substitutes like maple syrup or stevia for a healthier twist. - Cost-Effective & Budget-Friendly
Making jam at home is an affordable way to preserve seasonal fruit. Buying fresh strawberries in bulk during peak season and making your own jam is much cheaper than purchasing high-quality, artisanal jams from stores. Plus, you can make as much or as little as you need. - Long Shelf Life
With proper sterilization and canning, your homemade strawberry jam can last up to a year when stored in a cool, dark place. This makes it an excellent way to reduce food waste while keeping a stash of delicious jam ready for any occasion.
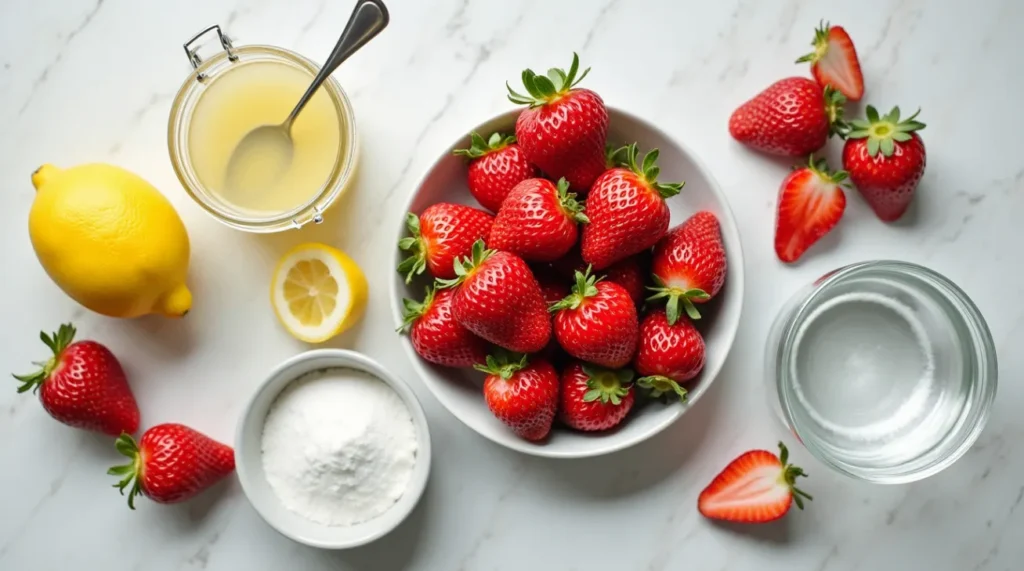
Ingredients
Essential Ingredients:
- 2 pounds (900g) fresh strawberries; Choose ripe, sweet strawberries for the best flavor. If using frozen strawberries, let them thaw and drain excess liquid.
- 2 cups (400g) granulated sugar; Helps preserve the jam and enhances the natural sweetness of the strawberries. Adjust based on your preference.
- 2 tablespoons fresh lemon juice; Adds a slight tangy balance and acts as a natural pectin source, helping the jam set properly.
Optional Additions for Flavor Variations:
- 1 teaspoon vanilla extract; Adds warmth and depth to the jam.
- 1 teaspoon balsamic vinegar; Enhances the strawberry flavor with a rich, tangy note.
- 1 teaspoon cinnamon; A subtle spice that pairs well with strawberries.
- 2 tablespoons honey or maple syrup; A natural alternative to sugar for a different sweetness profile.
- Chia seeds (2 tablespoons); A great way to thicken the jam naturally, making it a pectin-free, healthier option.
Instructions
Step 1: Prepare the Strawberries
- Wash the strawberries thoroughly under cold water to remove any dirt or residue.
- Hull the strawberries by removing the green stems and leaves. You can do this easily by gently pulling the green top off or using a paring knife.
- Mash the strawberries using a potato masher or pulse them briefly in a food processor, leaving some chunks for texture. If you prefer a smoother jam, mash them until they’re almost pureed.
Step 2: Cook the Jam
- In a large saucepan, combine the mashed strawberries, sugar, and lemon juice. Stir everything together until the sugar is mostly dissolved.
- Heat the mixture over medium heat, stirring occasionally. Once it starts to simmer, reduce the heat slightly and continue to cook, stirring frequently to prevent burning. You’ll notice the mixture thickening as it cooks.
- Skim off any foam that forms on the surface with a spoon. This step is optional but will help make your jam look more polished.
- Test the jam’s consistency by placing a small spoonful on a chilled plate. Let it cool for a minute, then run your finger through it. If it wrinkles and holds its shape, it’s ready. If it’s too runny, continue simmering for a few more minutes, checking periodically.
Step 3: Jar the Jam
- If you plan to store the jam immediately, prepare your jars by sterilizing them in boiling water for 10 minutes. This helps prevent bacteria growth and extends the jam’s shelf life.
- Carefully pour the hot jam into the sterilized jars, leaving about 1/4 inch of space at the top to allow for expansion.
- Wipe the rims of the jars with a clean, damp cloth to remove any residue.
- Seal the jars tightly with their lids. If you’re not planning to can the jam for long-term storage, skip the next step and just let the jars cool at room temperature before refrigerating.
Step 4: (Optional) Canning for Long-Term Storage
- If you want to preserve your jam for several months, you can use a water bath canning method:
- Place the sealed jars into a canning pot filled with hot water, ensuring the jars are submerged by at least 1 inch of water.
- Bring the water to a boil and let the jars process for 10 minutes to ensure a proper seal.
- Carefully remove the jars from the water and let them cool completely. You should hear a “pop” sound as the jars seal, indicating they are airtight.
Step 5: Cool and Store
- Once the jam has cooled to room temperature, store it in the refrigerator if you’re planning to use it within a few weeks. Properly sealed jars from the canning process can be stored in a cool, dark place for up to a year.
- Always check the seal before using jam stored for long periods. If the lid pops up when pressed, discard the jar.
Pro Tips and Variations
Pro Tips for Perfect Jam
- Use Fresh, Ripe Strawberries
For the best flavor, always use ripe, in-season strawberries. Overripe strawberries can lead to a watery jam, while underripe berries may lack sweetness. If you’re using frozen strawberries, make sure they’re thoroughly thawed and drained before cooking. - Adjust the Sweetness to Your Liking
Feel free to tweak the sugar to your preference. If you prefer a lighter jam, reduce the sugar by up to half. For a sugar-free version, you can substitute sugar with honey, maple syrup, or stevia. Just keep in mind that these alternatives may alter the texture slightly, so you may need to adjust the cooking time to get the right consistency. - Check the Jam’s Consistency
To test if your jam is ready, try the plate test: Before you start cooking, place a few small plates in the freezer. When you think the jam is done, drop a spoonful onto a chilled plate, let it cool for a minute, and run your finger through it. If the jam wrinkles and holds its shape, it’s done! If it’s still too runny, simmer for a few more minutes and check again. - Use a Heavy-Bottomed Pan
Helps distribute heat evenly and prevents burning. This ensures the jam cooks at the right rate without sticking or scorching. - Sterilize Your Jars Properly
If you’re planning to store your jam for long periods, sterilize your jars and lids by boiling them for 10 minutes. This is a crucial step to prevent spoilage and keep the jam safe for months.
Flavor Variations to Try
- Strawberry-Basil Jam
Add a fresh twist by incorporating chopped basil into your strawberry jam. Add the basil towards the end of cooking (after about 15 minutes of simmering) to keep the flavor vibrant. This variation pairs wonderfully with cheese and is a great conversation starter! - Vanilla Strawberry Jam
For a warm, aromatic jam, add 1 teaspoon vanilla extract to the strawberry mixture. The vanilla complements the sweetness of the strawberries, creating a more complex flavor. - Strawberry-Lemon Jam
Enhance the citrusy zing with extra lemon zest. The added lemon zest gives your jam a fresh, zesty taste that pairs beautifully with the natural sweetness of the strawberries. - Sugar-Free Strawberry Jam
For a healthier version, swap out the sugar for honey, maple syrup, or stevia. Be mindful that sugar substitutes may affect the texture, so experiment with the amount of sweetener and simmer time to find the right balance. - Spiced Strawberry Jam
Add a little warmth to your jam by stirring in cinnamon, nutmeg, or cardamom. A pinch of cinnamon pairs especially well with strawberries, creating a cozy, spiced jam perfect for winter months. - Strawberry-Chia Jam
Skip the pectin altogether and use chia seeds as a natural thickener. Simply stir in 2 tablespoons of chia seeds once the jam is done cooking, and let it sit for 15 minutes to allow the seeds to thicken the jam. This version is lower in sugar and provides added fiber.
Serving Suggestions
- Spread on warm buttered toast for a classic breakfast.
- Swirl into Greek yogurt or oatmeal for a fruity boost.
- Use as a filling for cakes, pastries, or thumbprint cookies.
- Pair with cheese and crackers for a sweet-savory combination.
- Drizzle over pancakes, waffles, or crepes for an indulgent treat.
Storage & Shelf Life
- Refrigerator Storage: If not processed in a water bath, store in the fridge and use within 3-4 weeks.
- Pantry Storage: Properly sealed jars (via water bath canning) can be stored in a cool, dark place for up to 12 months.
- Freezing Option: Pour jam into freezer-safe containers, leaving space for expansion, and freeze for up to 6 months.
Conclusion
Making homemade strawberry jam is simple, rewarding, and a fantastic way to enjoy strawberries beyond their peak season. With just a few basic ingredients, you can create a delicious spread that’s free of artificial additives and full of real fruit flavor. Try this traditional recipe today, and let the sweet, homemade goodness brighten up your mornings! 🍓

Strawberry Jam
Ingredients
Essential Ingredients:
- 2 pounds 900g fresh strawberries Choose ripe, sweet strawberries for the best flavor. If using frozen strawberries, let them thaw and drain excess liquid.
- 2 cups 400g granulated sugar Helps preserve the jam and enhances the natural sweetness of the strawberries. Adjust based on your preference.
- 2 tablespoons fresh lemon juice Adds a slight tangy balance and acts as a natural pectin source helping the jam set properly.
Optional Additions for Flavor Variations:
- 1 teaspoon vanilla extract Adds warmth and depth to the jam.
- 1 teaspoon balsamic vinegar Enhances the strawberry flavor with a rich tangy note.
- 1 teaspoon cinnamon A subtle spice that pairs well with strawberries.
- 2 tablespoons honey or maple syrup A natural alternative to sugar for a different sweetness profile.
- 2 tablespoons Chia seeds A great way to thicken the jam naturally, making it a pectin-free, healthier option.
Instructions
Step 1: Prepare the Strawberries
- Wash the strawberries thoroughly under cold water to remove any dirt or residue.
- Hull the strawberries by removing the green stems and leaves. You can do this easily by gently pulling the green top off or using a paring knife.
- Mash the strawberries using a potato masher or pulse them briefly in a food processor, leaving some chunks for texture. If you prefer a smoother jam, mash them until they’re almost pureed.
Step 2: Cook the Jam
- In a large saucepan, combine the mashed strawberries, sugar, and lemon juice. Stir everything together until the sugar is mostly dissolved.
- Heat the mixture over medium heat, stirring occasionally. Once it starts to simmer, reduce the heat slightly and continue to cook, stirring frequently to prevent burning. You’ll notice the mixture thickening as it cooks.
- Skim off any foam that forms on the surface with a spoon. This step is optional but will help make your jam look more polished.
- Test the jam’s consistency by placing a small spoonful on a chilled plate. Let it cool for a minute, then run your finger through it. If it wrinkles and holds its shape, it’s ready. If it’s too runny, continue simmering for a few more minutes, checking periodically.
Step 3: Jar the Jam
- If you plan to store the jam immediately, prepare your jars by sterilizing them in boiling water for 10 minutes. This helps prevent bacteria growth and extends the jam’s shelf life.
- Carefully pour the hot jam into the sterilized jars, leaving about 1/4 inch of space at the top to allow for expansion.
- Wipe the rims of the jars with a clean, damp cloth to remove any residue.
- Seal the jars tightly with their lids. If you’re not planning to can the jam for long-term storage, skip the next step and just let the jars cool at room temperature before refrigerating.
Step 4: (Optional) Canning for Long-Term Storage
- If you want to preserve your jam for several months, you can use a water bath canning method:
- Place the sealed jars into a canning pot filled with hot water, ensuring the jars are submerged by at least 1 inch of water.
- Bring the water to a boil and let the jars process for 10 minutes to ensure a proper seal.
- Carefully remove the jars from the water and let them cool completely. You should hear a “pop” sound as the jars seal, indicating they are airtight.
Step 5: Cool and Store
- Once the jam has cooled to room temperature, store it in the refrigerator if you’re planning to use it within a few weeks. Properly sealed jars from the canning process can be stored in a cool, dark place for up to a year.
- Always check the seal before using jam stored for long periods. If the lid pops up when pressed, discard the jar.
Notes
- Calories: 800 kcal
- Fat: 0g
- Carbohydrates: 208g
- Sugars : 12g
- Protein: 0g
- Fiber: 0g
- Sodium: 0mg
- Cholesterol: 0mg
- Diet: Vegetarian, Gluten-Free
- Method: Stovetop, Canning (optional)
FAQs
1. Can I make strawberry jam without pectin?
Yes, you can! This recipe doesn’t require commercial pectin. The natural pectin in strawberries, combined with the lemon juice, helps the jam set. Just make sure to simmer the mixture long enough for it to thicken properly.
2. How do I know when my strawberry jam is ready?
To test the consistency of your jam, place a small spoonful on a chilled plate. Let it cool for a minute, then run your finger through it. If the jam wrinkles and holds its shape, it’s ready. If it’s still too runny, continue simmering and test again.
3. How long does homemade strawberry jam last?
When properly canned and sealed, your homemade strawberry jam can last for up to a year in a cool, dark place. Once opened, store it in the refrigerator, where it will last for about 3-4 weeks. Always check the seal and the jam’s appearance before use.
4. Can I use frozen strawberries for making jam?
Yes, you can use frozen strawberries, but make sure to thaw them and drain any excess liquid before using. Frozen berries may release more water than fresh ones, so the jam might need a bit more cooking time to reach the right consistency.
5. Can I reduce the sugar in this recipe?
Yes! If you prefer a less sweet jam, you can reduce the sugar by half or even use sugar substitutes like honey, maple syrup, or stevia. Keep in mind that reducing sugar may slightly affect the texture and shelf life, so the jam might need a bit more cooking time to thicken.
6. Can I add other fruits to my strawberry jam?
Absolutely! You can combine strawberries with other fruits like blueberries, raspberries, or peaches for a mixed fruit jam. Just keep the total fruit quantity consistent with the recipe to maintain the right balance of flavor and texture.
7. Can I make strawberry jam without cooking it?
While this recipe relies on cooking to achieve the right consistency, you can try a no-cook strawberry jam by using chia seeds to thicken the mixture. However, the texture and shelf life of no-cook jams may differ, so it’s a good idea to refrigerate and consume them within a shorter period.
8. Can I make strawberry jam without a canning process?
Yes, you can skip the canning step if you plan to eat the jam within a few weeks. Just store it in sterilized jars in the refrigerator.


1 thought on “Easy Strawberry Jam Recipe”